
1.0 Introduction to the 4-4-2 Diamond
Understanding the core philosophy and historical context of the 4-4-2 Diamond is the first step for any coach considering its implementation. This strategic foundation provides the essential “why” behind the formation’s structure, player requirements, and tactical patterns, setting the stage for a deeper understanding of its operational mechanics on the pitch.
1.1 The Tactical Philosophy
The 4-4-2 Diamond, also known as the 4-3-1-2 or 4-1-2-1-2, is a narrow evolution of the traditional 4-4-2 formation. Its defining characteristic is a midfield arranged in a diamond shape: one holding midfielder, two central midfielders (often called shuttlers or mezzalas), and one attacking midfielder. This structure is deliberately designed to sacrifice natural width to achieve numerical superiority in the center of the pitch. By concentrating players centrally and staggering them on different vertical lines, the formation creates complex passing angles and positions players to operate between the opposition’s defensive lines, facilitating the quick, vertical attacks that are the formation’s primary objective.
1.2 A Legacy of Success
While the formation has drifted in and out of tactical fashion over the years, its pedigree is proven by the elite teams that have used it to achieve significant success. This history demonstrates the 4-4-2 Diamond’s potential when executed with the right personnel and coaching.
- Carlo Ancelotti’s AC Milan: Leveraged the formation to dominate world football in the early 2000s.
- Jose Mourinho’s Porto: Employed the diamond on their way to becoming Champions League winners in 2004.
- Brendan Rodgers’ Liverpool: Finished as runners-up in the 2013-14 Premier League season, scoring a remarkable 101 goals with the diamond as their primary shape.
The success of this formation is fundamentally dependent on having players with the correct attributes for each specialized role, as these individuals are responsible for executing its unique tactical demands.
2.0 Positional Roles and Required Player Attributes
Strategic player profiling is paramount when implementing the 4-4-2 Diamond. Unlike more conventional shapes, the formation’s effectiveness is highly reliant on specific player attributes to compensate for its inherent narrowness and facilitate its vertical attacking style. Without the correct personnel, the structure collapses, becoming disjointed and tactically incoherent.
2.1 The Defensive Unit
Centre-Backs The two centre-backs have dual responsibilities that extend beyond traditional defending. Because the team will often look to build possession from the back, they must be comfortable on the ball to initiate attacks. Simultaneously, the formation’s narrowness makes the team susceptible to crosses, meaning the centre-backs must also be strong and quick enough to defend the wide channels abandoned by the attacking full-backs and cover the resulting space on the counter-attack.
Full-Backs The full-backs must be treated as one of the most critical and demanding roles in the system, serving as the team’s only natural source of width. It is essential for them to contribute regularly to the attack, providing overlaps and crosses to stretch the opposition defense. This constant demand to shuttle up and down the entire length of the pitch makes excellent stamina a non-negotiable attribute for players in this position.
2.2 The Diamond Midfield
The Holding Midfielder (#6) This player is the pivot of the entire team. Defensively, their primary duty is to shield the defense by maintaining a central position and covering any runs between the lines. In the build-up phase, their role is indispensable; they provide a crucial link between defense and attack, often dropping to support the centre-backs to help outnumber an opposition’s high press and securely advance the ball.
The Shuttlers/Mezzalas (#8s) Arguably the most flexible role, the two shuttlers operate on either side of the holding midfielder. Their core mission is to support both attack and defense. They are responsible for creating overloads in wide areas, making runs into the half-spaces, and constantly moving to find space between the lines. Crucially, their positioning can be as wide or as narrow as needed, allowing a coach to tweak the formation’s shape in-game without substitutions to adapt to the opposition.
The Attacking Midfielder (#10) Positioned at the tip of the diamond, the attacking midfielder is the focal point of the attack and the player primarily responsible for creating plays. This role demands a player who is excellent under pressure and possesses a fantastic passing range. They must be able to unlock the defense by playing through balls to the strikers or laying the ball off to overlapping teammates.
2.3 The Strike Partnership
The 4-4-2 Diamond’s structure naturally creates less width, which in turn gives space for more technical and quick strikers to flourish. The formation accommodates different types of strike partnerships, both of which are designed to complement this verticality. The two most effective pairings are:
- A duo of quick, technical attackers. One striker uses intelligent movement to attack the channels and stretch the defense, while the other drops deeper to link up play and connect with the midfield.
- A traditional target man paired with a second striker. The target man can win long balls and challenge central defenders, with the second striker positioned to collect flick-ons or lay-offs and exploit the resulting space.
These player roles, when filled by individuals with the right attributes, combine to execute a potent and cohesive attacking structure.
3.0 Offensive Blueprint: Build-Up and Attacking Patterns
The 4-4-2 Diamond is engineered for quick, vertical attacks that originate from a secure build-up phase. The formation’s central concentration of players provides a natural advantage in possession, allowing the team to play through pressure before launching incisive attacks. This section deconstructs the specific mechanics of how the formation moves the ball from defense to attack and creates scoring opportunities.
3.1 Principles of Building from the Back
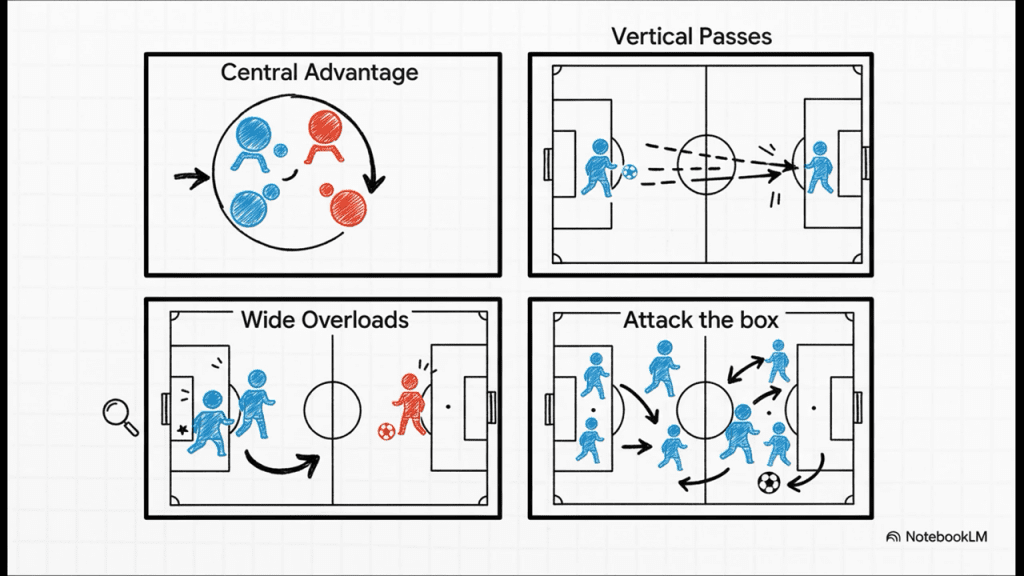
The central overload is a key strength during the build-up. The diamond’s structure allows it to effectively outnumber common pressing formations and create clear passing lanes to advance the ball.
- Against a 4-3-3: The diamond’s four midfielders create a 4v3 overload in the center of the pitch, making it difficult for the opposition to apply effective pressure.
- Against a 4-4-2: To counter the diamond, the opposition’s wingers are often forced to move into central areas. This movement inherently vacates the wide spaces, creating room for the attacking full-backs to advance up the pitch.
While excellent for methodical build-up, the formation is also highly effective for teams that wish to play long balls. Having two strikers means they can pin both opposing centre-backs. A direct ball from the back can be flicked on to the other striker running in behind, or it can be laid off to the attacking midfielder, who can find space between the lines to receive the ball and initiate the next phase of the attack.
3.2 Achieving Verticality: The “Ball Forwards, Ball Backwards” Method
The staggered positioning of players on different vertical lines naturally creates more passing lanes, which is ideal for moving the ball forward quickly. A primary tactic to bypass the first line of pressure and free the crucial holding midfielder is the “ball forwards, ball backwards” method.
- The Problem: The opposition’s strikers often shadow-mark the holding midfielder, preventing a direct pass from the centre-backs.
- The Solution: A centre-back identifies that a shuttler has an open passing lane and plays a forward pass to them.
- The Execution: The shuttler, now under pressure, lays the ball off to the holding midfielder. This simple combination allows the holding midfielder to receive the ball while facing forward, ready to advance the attack and break the next line of the opposition’s defense.
3.3 Creating Overloads and Exploiting Half-Spaces
Once the ball progresses up the pitch, the formation excels at creating wide overloads to destabilize the defense. This is a precisely coordinated movement involving the full-back, shuttler, and strikers.
- The two strikers position themselves to pin both of the opposition’s centre-backs, preventing them from shifting over to help defend the wide area.
- The attacking full-back advances with the ball, occupying the opposition’s full-back and forcing them into a 1v1 confrontation.
- The shuttler on that same side then executes a run into the half-space behind the defending full-back, creating a 2v1 or 3v2 overload and forcing the opposition midfield to react, which in turn can open up central passing lanes.
3.4 Final Third Combinations
In the attacking third, the 4-4-2 Diamond relies on intelligent movement and combination play to create scoring chances.
- Attacking Midfielder’s Role: The #10 finds pockets of space between the opposition’s defense and midfield. From here, they can lay the ball off to overlapping shuttlers, play decisive through balls to the strikers, pick out a player at the second post, or dribble inside to take a shot at goal.
- Strikers’ Movements: The strikers work in tandem to lure defenders out of position. One striker might come short to receive a pass, creating space in behind for the other striker or an advancing midfielder to exploit.
- Attacking the Box: The formation allows the team to commit numerous players forward into scoring positions. It is common to see a full-back, both strikers, the attacking midfielder, and one shuttler all attacking the box, while the remaining midfielders position themselves at the edge of the area for cutbacks or to recover cleared balls.
The formation’s attacking prowess is matched by a robust and adaptable defensive structure designed to protect its central strength.
4.0 Defensive Blueprint: Pressing and Structural Integrity
The defensive philosophy of the 4-4-2 Diamond is centered on leveraging its central numerical superiority. The core aim is to create pressing traps that force the opposition into the crowded middle of the pitch, while maintaining the collective discipline required to cover the formation’s primary areas of vulnerability on the flanks.
4.1 The Central Pressing Trap
The primary pressing scheme is designed to funnel the opposition inward, where the diamond has a numerical advantage. This is achieved through a sequence of coordinated actions:
- The two strikers position themselves to cut off the passing lanes from the opposition’s centre-backs to their full-backs.
- The attacking midfielder moves to apply pressure on the opposition’s holding midfielder.
- This sequence effectively forces the ball into the center of the pitch, where the opposition’s central midfielders find themselves outnumbered in a 3v2 situation by the diamond’s holding midfielder and two shuttlers.
4.2 Defending the Flanks and Shifting as a Unit
When the opposition successfully moves the ball into wide areas, it triggers a disciplined, team-wide defensive shift. The entire team must move as a unit toward the side of the ball with the tactical intent of slowly squeezing the space available and stopping any quick switches of play. The nearest full-back is responsible for pressing the player in possession, while the shuttler on that same side shuffles over to cover the inside passing lanes, preventing the opposition from easily playing back into the center.
4.3 Maintaining a Compact Shape
It is critically important for the midfield four to stay close together, denying any space in the center of the pitch. Because this central area is the formation’s greatest strength, allowing an opponent to receive a pass through the middle can completely unlock the defense. This compactness also allows players to cover for one another. For example, if a full-back is drawn far up the pitch to press, the holding midfielder can shift across and temporarily drop into the back line to cover the vacated space and slow down the attack.
This disciplined defensive structure is essential for maintaining the overall strategic balance of the formation, which has both clear strengths and weaknesses.
5.0 Strategic Considerations: Strengths, Weaknesses, and Flexibility
For a coach to master the 4-4-2 Diamond, they must have a clear-eyed view of its inherent advantages and its critical vulnerabilities. A deep understanding of this balance is essential for making informed strategic decisions, both in preparation and during in-game management.
5.1 Core Strengths Analyzed
The formation’s structure provides several distinct tactical benefits that a team can build its game plan around.
| Strength | Tactical Impact |
| Central Overload | Provides more central cover, creates better passing angles, and allows players to be positioned between the lines to disrupt defensive shapes. |
| Tactical Flexibility | The compact diamond shape allows the formation to quickly morph into other lineups to adapt to game situations. Offensively, it can become a 3-5-2 or 4-2-2-2. Defensively, it can drop into a standard 4-4-2 or 4-3-3 to counter the opposition. |
| Vertical Play | The staggered player positions are ideal for quick, vertical attacks and create space for technical strikers to flourish. |
5.2 Critical Vulnerabilities Exposed
Alongside its strengths, the formation has key weaknesses that a savvy opponent will seek to exploit.
- Player Dependency: The system is highly reliant on players with specific, often demanding, attributes. It requires high-stamina full-backs, a press-resistant attacking midfielder, and intelligent midfielders. Without the right personnel, the team becomes disjointed and the formation’s potential cannot be realized.
- Exploitable Width: The formation’s inherent narrowness is its most significant vulnerability. If an opponent can move the ball effectively into wide areas, they can create 2v1 overloads against the isolated full-back. This problem is compounded by the fact that once the diamond shifts to one side to defend the flank, a quick switch of play to the opposite side can leave an opposing winger or full-back with immense space to attack.
- Counter-Attack Vulnerability: With full-backs committed high up the pitch to provide width, the team is exposed to quick counter-attacks in the space left behind them. If possession is lost, the defense can be swiftly outnumbered, creating high-quality chances for the opposition.
These considerations must be at the forefront of a coach’s mind when deciding if the 4-4-2 Diamond is the right fit for their team.
6.0 Conclusion: Key Principles for Successful Implementation
The 4-4-2 Diamond is a potent and historically proven formation capable of dominating possession, creating intricate attacking patterns, and overwhelming opponents through central superiority. However, its success is not guaranteed by the shape alone. The system’s effectiveness is a direct result of a coach’s ability to master its core principles. This requires selecting players with the very specific physical and technical attributes needed for each demanding role, drilling the intricate movements required for both its vertical attacks and its compact defensive shifts, and strategically managing its inherent risks—namely, its vulnerability in wide areas. When implemented by the right manager with the right players, the 4-4-2 Diamond remains a deadly tactical weapon that can unbalance even the most organized defenses.